Enter Vehicle Identification Information
-
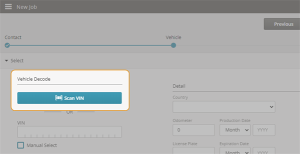
To Decode a vehicle you can scan the VIN, type the VIN, or manually select a vehicle without entering a VIN.
- Scan the VIN – Click or tap Scan VIN and take a picture of the VIN with your device's camera.
Note: Depending on the internet browser you are using, you may need to allow access to your device camera.
For example, in Chrome, the camera icon indicates that the web page is accessing the device camera.
Tip: Internet Explorer is not a supported browser for use with this feature
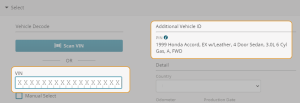
- Enter the VIN in the VIN field. The vehicle description is visible in the Additional Vehicle ID section.
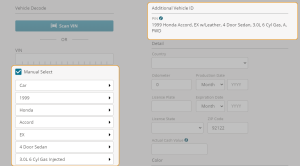
- Manually select a vehicle–Use this method if you are working with a vehicle not in the Mitchell database.
- Select the check box next to Manual Select.
- Select the vehicle Type.
- Select the following vehicle information: Type, Year, Make, Model, Sub Model, Base, 4 Door Sedan, Engine, Transmission, Drivetrain.
Specialty Vehicles:: The fields vary according to the vehicle type you select. You can select specialty vehicles including All-Terrain Vehicles (ATV), Recreational Utility Vehicles (RUV), and Motorcycles. For specialty vehicles, ACV and paint code options must be entered manually. PIN options are not available.
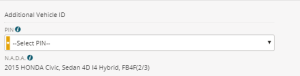
- In the PIN list, select the correct description for the vehicle if there are multiple options.
- Scan the VIN – Click or tap Scan VIN and take a picture of the VIN with your device's camera.
- In the Detail section, select the country and enter the following:


-
Odometer reading
-
Production date
-
License plate
-
Expiration date
-
Province
-
Postal Code

- In the Description section, enter any additional relevant information for the vehicle, such as fleet number.
Note: If you are using a non Mitchell estimating program in your process, there are some differences with how the description information is saved in the EMS file. Content entered in the Description section is saved to the V_Memo field in the EMS file. If the vehicle is coded as Generic, this content is saved to V_Makedesc field in the EMS file. If no description is entered for a generic vehicle, the V_Makedesc field is auto-populated with the word Generic.
- In the Color section, select the applicable paint option:
- Two Tone– Select only if the vehicle has two different colors on the same panel. Selecting this option adds an additional operation that will automatically be calculated and added to the applicable repair lines in the estimate .
- Three Stage– Three stage paint can be identified by the paint code on the vehicle and is available in the Information section of the estimate. Selecting this option adds an additional operation that will automatically be calculated and added to the applicable repair lines in the estimate.
- Enter the Paint Code 1, Interior Color, and Trim Color in the appropriate fields. In the Paint Code 1 field, start typing the paint code description and click on the color when it appears. The selected paint code is printed on the estimate.

- In the Equipment section, select the Packages and Options that are present on the vehicle in the Optional tab.
- Click Show Detail to view detailed information for the packages and options.
- Add additional equipment.
- Click the Standard tab to view the standard equipment included on the vehicle.
Note: You can also view and modify vehicle information from the Estimate Editor.
Two Stage Paint: You do not need to make a selection for two stage paint. All Mitchell paint times are based on a two stage base coat and clear coat process.
Note: You can apply or remove the two tone or clear coat designation to individual repair lines. Any changes you make will update the labor hours and estimate totals appropriately. Repair lines two tone or clear coat applied appear on the estimate printout. This will be designated on by a T for two tone and an A for clear coat.
